At present,Lithium-ion/Lithium-polymer are used extensively in portable electronic devices that are frequently charged. An efficient charging method increases the battery’s lifetime and enhances its performance. Therefore, electronic designers must be aware of the ideal charging procedure, in designing battery-powered devices that are required to pass industrial requirements.
Lithium-ion Batteries
Lithium is the lightest available metal. It introduces the greatest electrochemical potential and provides the largest energy density for its weight. Lithium is inherently unstable, especially during charging. Therefore, researchers focused on non-metallic lithium batteries that use lithium ions. The lithium-ion offers a slightly lower energy density than lithium metal, however, lithium-ion is safe if certain precautions are met (while charging and discharging). The first company that commercialized the lithium-ion batteries was Sony Corporation in 1991. Soon later, other manufacturers followed them. Figure 1 shows a picture of lithium-ion batteries.
Lithium-Polymer Batteries (Lipo)
The difference between lithium-polymer and conventional batteries is the type of used electrolyte. The original Lipo design uses a solid polymer electrolyte. This electrolyte acts like a plastic film that allows ion exchange but blocks the electricity. Usually, lipo batteries suffer from high internal resistance and weakness in handling high current bursts (although this problem was solved in some expensive high-capacity lipo batteries), however, they achieve better safety rankings and can be manufactured in low-thickness profiles. This makes them ideal for slim portable devices like cell phones and tablets. Figure 2 shows a lipo battery.
How to charge Lithium-ion and lithium-polymer batteries
Regarding charging rules, the lithium-ion and lithium-polymer batteries are not that much different. Figure 3 shows a complete charging cycle. A full charging process consists of 3 steps: PRE Charge, CC, and CV.

PRE Charge
This stage is referred to the condition that a lithium battery's initial voltage is below 2.8V. As a rule of thumb, a lithium battery voltage (of any kind) should not fall below 3.2V, otherwise, the battery is dead and needs “rejuvenation”. You have probably encountered a condition where your batteries remained unused for a long time (for example inside your digital camera) and their voltages dropped below 3.2V. You can not turn the device on or charge the batteries normally.
The pre-charging stage is important because if the charging process starts from the CC stage and a high current applies to a dead battery, it would damage the battery even more and shorten its lifetime. Therefore a dead battery charging process should start with a current equal to 10% to 20% of the battery’s rated capacity. For example, if the dead battery capacity is rated at 2,200mA and you plan to charge it with 0.5C (1,100mA), you must set the charging current to 220mA or even lower for the PRE Charging step. All professional chargers implement the pre-charging stage. This is how you can bring your battery back to life!
CC (Constant Current)
If the battery's voltage is above 2.8V (or reached this level by the Pre-charging stage), it can be charged with a constant current at around 0.5C to 1C.
The charging rate of a battery is mentioned in the datasheet. Usually, it is a value between 0.5C and 1C. Some battery manufacturers allow higher charging currents for faster charging, but if you are unsure or don't have access to the datasheet, charge the battery at 0.5C. for example, if your battery has been rated at 2,200mA, you must limit the charging current to 1,100mA.
CV (Constant Voltage)
As is clear in Figure 3, after the battery reaches 4.20V (or 4.10V in some battery types), As is clear in Figure 3, after the battery reaches 4.20V (or 4.10V in some battery types), the current draw reduces and the voltage and current curves enter the CV stage. The 4.20V is a critical value and must be prepared with at least 1% accuracy or better; otherwise, the battery will be damaged or explode!
In the CV stage, the voltage is constant (4.2V), but the current flow reduces until it reaches 10% of the charging current. For example, if you start the charging process with the 1100mA current (0.5C of a 2200mA battery), you should stop charging at the threshold of 110mA, indicating a full battery. Many cheap battery chargers skip the CV step and just cut off the current when the battery the voltage reaches 4.2V, but a good charger should follow the CV step.
How to charge the lithium batteries
So far you theoretically know how to charge the lithium batteries. But how should these concepts be implemented in practice? You have two options: designing your charger by mixing a microcontroller and a variable switching/linear power supply or using a standalone lithium battery charger chip. I’ll cover the charger chip because it is easy to build and maintain. Besides, you can embed one of these chips inside your product/circuit board and power the circuit from the charger’s output. The good news is that these charger chips’ reverse current draw is shallow and doesn’t drain the battery.
There are a lot of lithium cell charger chips in the market. One good choice could be LTC1733. It is a standalone linear 1-cell lithium charger. It can provide a maximum 1.5A charging current. Also, it provides 1% accuracy for the charging voltage. Figure 4 shows the basic schematic diagram that enables the LT1733 with some external components.
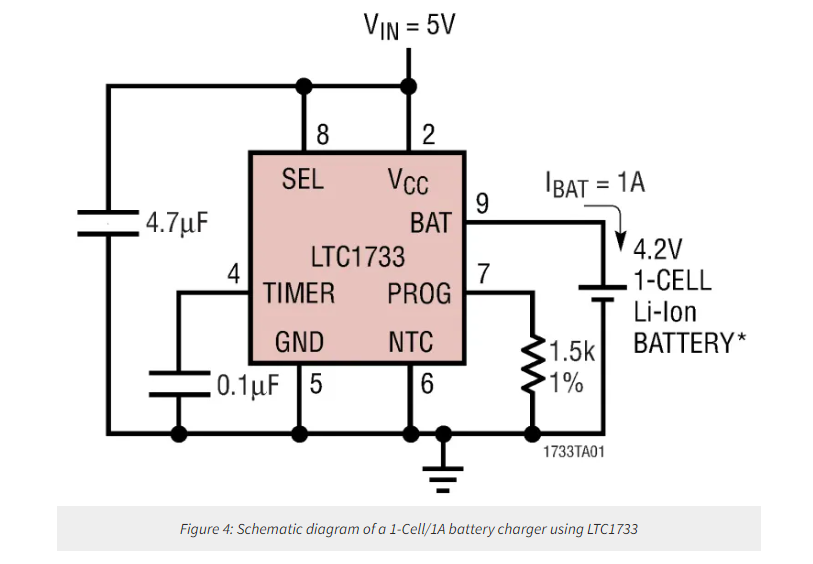
By modifying the pull-down resistor of the PROG pin, you can set your desired charging current. The resistor value can be calculated by the following formula (Equation 1):

Figure 5 shows the charge current vs battery voltage. With the calculated PROG resistor (1.5K), the charge current for the CC stage is around 1A. The pre-charging stage is named “trickle charge” and is around 100mA (if the battery voltage is below 2.5V).
About US
Heisener Electronic is a famous international One Stop Purchasing Service Provider of Electronic Components. Based on the concept of Customer-orientation and Innovation, a good process control system, professional management team, advanced inventory management technology, we can provide one-stop electronic component supporting services that Heisener is the preferred partner for all the enterprises and research institutions.